Welcome


Greetings!

Thanks for visiting my vintage Hamilton watch blog. I like to restore US-made Hamilton wrist watches back to their original glory and share my experiences with other enthusiasts. Use the "Search" space below if you know what model you're looking for. Feel free to leave polite comments or questions in the spaces provided. Also check out my "watches for sale" on my Etsy site - the link is on the right, just below.

Tuesday, August 21, 2012

1955 Murray Overhaul

The mid-1950's was an interesting time for Hamilton watches.  Several new movement grades were introduced... the 12/0 sized 752, 753, 754 and 770's, the 8/0 sized 730 and 735 replacements for the older 747 and 748, the 11-1/2 ligne Swiss movements, and of course the variety of Swiss automatics.  And in the late 1950's the electric movement (500, 505) was introduced as well.

The numbers of models in Hamilton's lineup seemed to triple over the 10 year span from 1950 to 1960 and increased even more during Hamilton's last US-made decade.


In 1955 Hamilton had two types of men's watches... round and funky-shaped.  The latter often exhibited lots of angles, shaped lugs, and dials with angular patterns.  Some of these watches were really out there style-wise but a good example of a 1950's design is the 1955 Murray.


The Murray was a mid-grade watch with a 10K gold filled case with 18K solid gold numerals and markers on a sterling silver dial.  It featured the 8/0 17 jewel 747 movement.  The Murray was made for three years and discontinued after 1957.

Here's an example of a Hamilton Murray and a recent overhaul.  This is what it looked like as received... it's in nice shape, the crystal is scratch free, a little dusty on the dial but otherwise nice.


Outside of the case, the grime on the dial is more apparent.  Note how the angled markers line up with the lines radiating from the center of the watch.  Everything lines up right - which is a good indicator that this is an original dial.


Here the front, back, dial and movement are ready for their various treatments.  Hamilton often stamped the model name inside the case back, but not always.


I really like the 747 movement.  I think it's one of the best movements to tinker with if you want to know how to take apart a watch and successfully put back together.  All of the bridges cover no more than two wheels so getting everything lined up is pretty easy (after a little practice).  It's 8/0 sized cousin, the 748, has a four-wheel bridge and getting all four pivots to line up perfectly will test anyone's patience (and blood pressure).

To disassemble the movement first the canon pinion is removed from the front, then the mainspring tension is let off, then each screw is removed to pull off each part and reveal the wheels underneath.


Here everything is laid out in a somewhat organized fashion and ready for cleaning.


I clean the heavy stuff separately from the light stuff.  I have three jars of cleaning solution.  One gets the most dirty, then I move the parts to the second one, and then I rinse them in the third one.  When the first one gets really dirty I empty it and put fresh solution in.  Then the second jar becomes the first jar.

In this shot you can see the fluid gets kind of hazy even with what would appear to have been a pretty clean movement to start with.


Now all the watch parts are clean.  While it all dries I buff the case and clean the dial.  Cleaning a dial is a delicate process and the first rule of dial cleaning is don't do it unless you're willing to get the dial restored - as you're very likely to goof it up.

I was quite careful with this dial and was able to get it cleaner but not overdone.


Reassembly starts with the pivot fork and the pivot fork bridge.  Every jewel and bearing surface gets a tiny droplet of oil.


Next the escape wheel and the fourth wheel get installed along with the train bridge.  I also put on the mainspring barrel.


Next the third wheel and the center wheel go on and we're ready to put the barrel bridge back on.


With the barrel bridge back on spring tension can be applied to the mainspring with a few winds of the crown.  Then I re-install the balance assembly.  I like to have a little tension on the gear train so that the watch will start running when everything is lined up right.


With the watch reassembled and running I put it on the watch timer to see what it looks like... 7 seconds fast per day - pretty good, a slight tweak to the regulator could slow it down but I think 7 seconds is not too shabby.


The keyless works on the front of the movement needs lubrication too.  So before the dial goes back on all these parts get some grease.


Now the cleaned up dial goes back on.  And the hands can be reinstalled.


Back in it's freshly polished case, this Murray is ready for a nice strap and some wrist time!


Monday, August 20, 2012

1933 Grant

In the 1920's and '30's Hamilton made a few models in sterling silver in addition to gold or gold filled.  One of the models was the 1933 Grant.  This watch was made for only two years and was paired with another watch... the Lee.


The gold filled model is much more common than the sterling silver model.  The Raised Gold Figure (RGF) dial is more common than luminous but both can often be found.

The filled model typically shows wear through on the high points of the bezel in the corners.

The RGF dial is textured almost like a wood grain.

The watch is powered by the 6/0 sized 17 jewel 987 movement, typically a 987F.

On the wrist, the Grant is a nice looking watch.  It seems a little thicker than other models which may be why wear through on the bezel is so common.


I think the figures on the luminous dial are really interesting.  Photo courtesy of fellow Hamilton nut, Tom Diss.


Sunday, August 19, 2012

1963 Accumatic A-502 Overhaul

I recently overhauled a 1963 Hamilton Accumatic A-502.  The A-502 was only available in 1963 and 1964.  Being a 5XX series watch, you know that it has a stainless steel case.  It was available on a bracelet or a strap.

A lot of folks try really hard to put the right bracelet on their watches.  I think doing so really brings to life the design intentions originally created by the watch designers.  Of course, it also represents an even greater challenge in the world of collecting vintage watches.

Me?  I'll stick with a nice lizard strap, thanks.

Fine mechanical watches need regular maintenance and should be serviced every 3-5 years.  A service generally means the disassembly and cleaning of all the parts, then the oiling and lubing of friction areas and reassembly.  After servicing, the watch timing should be checked to make sure that it works as it should.  A lot of things can upset the timing of a watch.  Even a smudge of oil on the hairspring will throw off the beat.

To show you what it takes to overhaul an automatic, let's start with the A-502 as received.  This one is in nice shape overall.  This type of watch opens through the crystal.


A special tool compresses a bunch of fingers around the circumference of the crystal and draws the diameter in so the crystal can be pulled off.


With the crystal removed the next step is to remove the hands.


With the dial removed you can see the female portion of the two-piece stem.  The slot embraces the male portion still in the watch that is attached to the crown.  Getting the movement out is pretty tricky because you have to line everything up but you can't see it very well with the dial in place.


Next step is to remove the hour hand wheel and the canon pinion (that the minute hand attaches to).


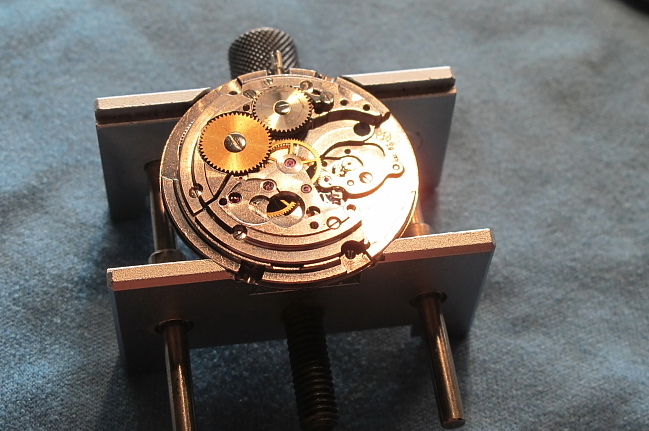
Flipping it over, you can see the rotor on the back of the movement.  As this weighted rotor swings around it winds the watch using a gear train beneath it.  Two screws hold it in place - you can see one of them at about 9:00.


With the rotor removed the watch now looks like a typical manual movement - albeit with a few extra holes here and there.


There are a bunch of parts still attached to the rotor.  They should be removed, cleaned and oiled like everything else.


With the mainspring tension fully let off, the barrel bridge can be removed and reveal the mainspring barrel.


The train bridge comes off next, revealing the four wheels.  Once they're removed you only have the balance assembly and the pivot fork left on this side.


The balance is removed and now there's only one screw left.  It holds the pivot fork bridge in place.


The rotor can be fully disassembled too.


Once all the parts are cleaned in the ultrasonic cleaner they must be dried. At this point we're ready for oiling  and assembly.


Every bearing surface gets a small droplet of Moebius oil.  Reassembly follows the reverse of disassembly, except the balance goes on a little later.

First step is to put the pallet fork back in.


Now all four wheels are re-installed and I put the mainspring barrel and barrel bridge back on to aid the next step.


The train bridge connects all four wheels and getting each of the four pivots to line up with their respective jewel takes a steady hand and a lot of patience.  Each jewel is oiled before installation.  The reason I put the balance on later is so that I can see which wheels need to be aligned and get my tweezers in there to move them.

I always breath a little easier at this point.


Put the mainspring winding wheel back on and you can add tension to the mainspring and gear train.  The pivot fork holds the power.  Without the pivot fork the gears would spin freely and let all the tension go.

I put a little tension in the gears so that when I put the balance assembly back on the watch will start running.  Then I know everything is lined up correctly.


With the balance back on and the watch running, the rotor assembly goes back in it's proper place.


On the front side, all the parts of the "keyless works" are reinstalled and lubed.


Now the watch is ready for the dial.  Note you can just see the female portion of the stem.


Putting the movement back in the freshly polished case is as much a pain as getting the darned thing out to begin with.  With patience and persistence it all goes back in place eventually.


Last step is to put the hands back on and the crystal.


I check the timing when I reinstall the balance but I also check it when everything is back in it's proper place.  15 seconds fast per day... not too shabby.  A lot of things can effect the timing of a watch and I try to stay within +/- 30 seconds per day.  This one could probably be adjusted even closer to zero but that would require taking it apart again - and the risks from that outweigh the benefit 15 seconds per day.


And that's it... good to go for another five years or so.